In this guide, you will learn how to install the stromleser.tasmota digital electricity meter, set up Tasmota, and then integrate the stromleser into the stromleser app.
Step 1: Activating the electricity meter with PIN
If you haven't already done so, you must first enter your PIN.
Without the PIN, many meters only display the meter reading – Real-time values are not displayed .
1. Request PIN: from the metering point operator
2. Start PIN entry: either with a flashlight or with special PIN apps.

3. Activation: Shine the flashlight on the beam for a few seconds.

4. Input: Each light pulse represents a number (e.g., 5 pulses = number 5)


⚠️ In order for the electricity meter reader to be able to transmit data continuously, the PIN option must be set to “Off” and the information interface to “On” on some meters.

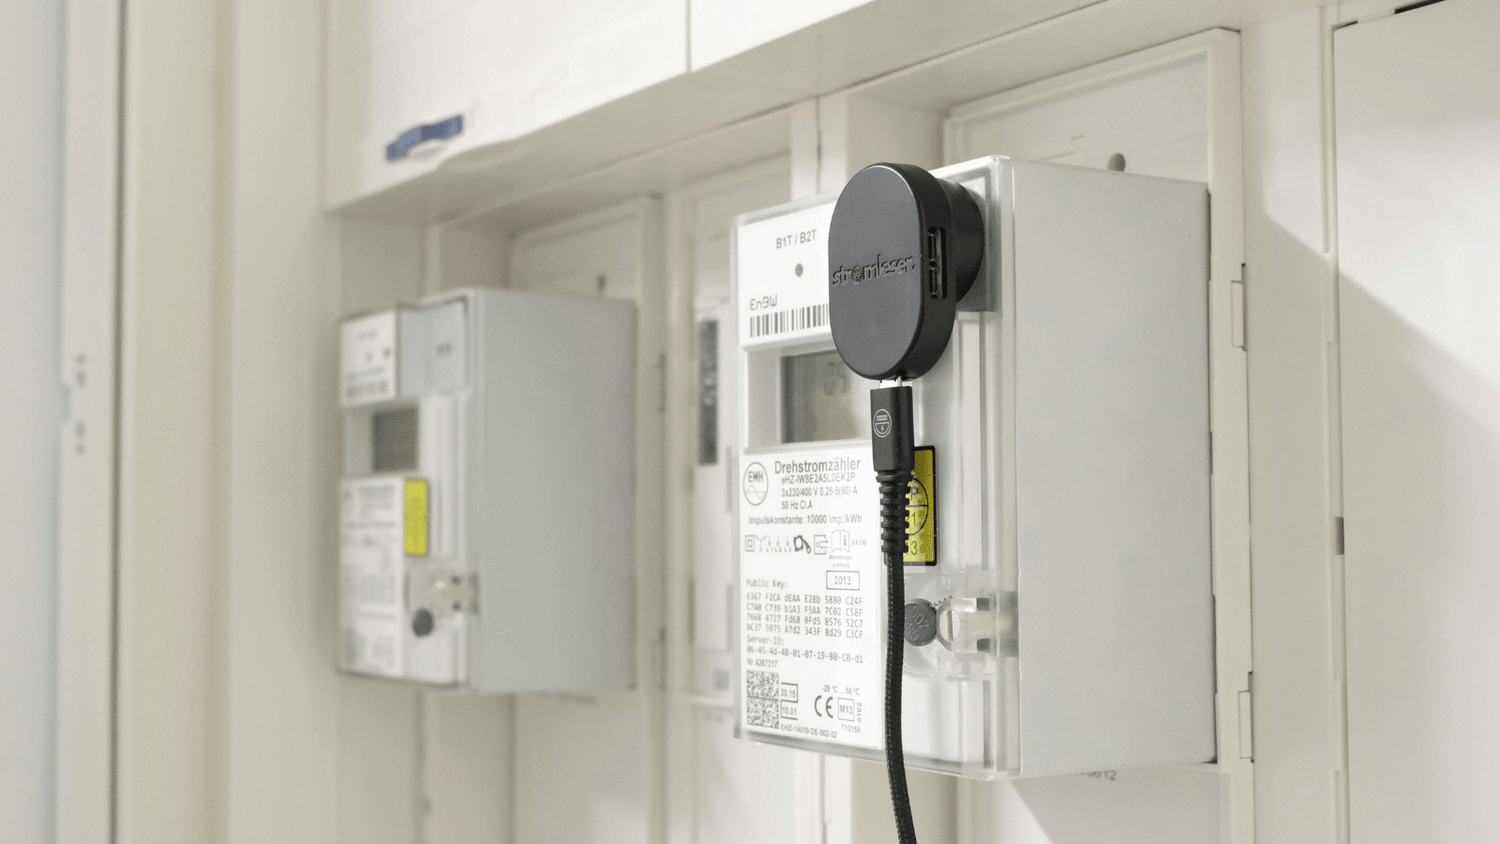
Step 2: Attach the stromleser.tasmota to the meter
1. Attach the metal disc: Glue the metal disc onto the for a secure hold. DO position at the counter.

2. Attach the electricity reader: The power meter is attached magnetically.
3. Check alignment: Align the logo horizontally so it is legible.

If the plastic stem is in the way, you can also mount the power reader in the 45° angle attach.

Important: The right light source your meter must Receiving diode the stromleser overlap.
Step 3: Connect to Wi-Fi & set up Tasmota
1. Connect to Tasmota Wi-Fi: Open your smartphone's Wi-Fi settings and select the Tasmota network out of.

2. Open the configuration page: It usually appears automatically. If not, enter the address in your browser. http://192.168.4.1 input.

3. Enter home network: Select home network, enter Wi-Fi password, and click Save.

4. Note the device IP address: After saving, the device's individual IP address is displayed (often only for about 20 seconds). It is best to write it down or take a photo immediately.
Tip: Press and hold the IP address to open it in a new window, or enter it manually in your browser.

⚠️ Important: Do not perform a firmware update in Tasmota – this can damage the firmware. There are separate instructions for reflashing.
Step 4: Reset stromleser (if necessary)
If the connection fails or the IP address cannot be opened:
1. The stromleser 7x briefly disconnect from the power supply and plug it back in.
2. Then restart the installation.
3. If it still doesn't work: Contact support → info@energieleser.de
Step 5: Configure script (counter profile)
1. Open the website: https://energieleser.de → Rider "Compatibility"

2. Select script: Select the manufacturer and meter model of your meter (e.g. Landis+Gyr E320).
3. Copy script and switch to the Tasmota interface

4. Insert script:
- Menu Tools → Configure Script
- Delete existing text

- Paste copied script
- Check the box next to “Enable script.”
- Save

5. Return to the main menu
6. Check data: Meter data should appear after a few seconds.

Common script errors
Spaces at the beginning or end of the script.

Forgot to check “Enable script.”

For a single stromleser.tasmota, no changes need to be made to the script.
Will one or more stromleser.ttl If an additional connection is made, the script must be extended.
Example: If the current reader.ttl is connected at the top right, the script must contain the IO ports 5 4.

You can find the complete overview of the I/O ports here:


Step 6: Integrate into the stromleser-App
1. Install the app:
From the App Store or Google Play Store stromleser-App download

2. Register/Log in:
- via Google or Apple or
- with e-mail (First name, last name, email, password) → Register → Enter verification code

3. Add device:
In the app stromleser → stromleser.tasmota choose

Browse network or manually enter IP address

Select stromleser.tasmota, assign a device name, click Connect click
4. Advertisement:
The values will local transferred. You'll only see them if your smartphone is in same Wi-Fi like the electricity reader.
The stromleser.tasmota will then appear in the Home section of the app, where all values are clearly displayed..

Troubleshooting
- No live data: PIN not set? → PIN option off & Information interface On check
- Tasmota page does not open: With Tasmota Wi-Fi Connected? Otherwise http://192.168.4.1 manually call
- Forgot device IP: In the Router Check or reset the power reader (7x power off)
- No data after script: Correct counter model selected? Script activated? No spaces inserted?
- Multiple devices: Script to correct IO pins extend (e.g. IOTS54)
- App cannot find device: Are the smartphone and power meter on the same Wi-Fi network? Possibly. Enter IP address manually
Support
If something goes wrong, it's usually just a minor issue. Get in touch with us – we'll help you quickly and easily.
Have fun! Read electricity !


Leave a comment
This site is protected by hCaptcha and the hCaptcha Privacy Policy and Terms of Service apply.